How to integrate google analytics with Laravel websites?

Learn about to integrate google analytics with Laravel in this tutorial.
Google Analytics is a powerful tool that allows website owners to track and analyze user behavior on their sites. It provides valuable insights into website traffic, user demographics, popular content, and much more.
Integrating Google Analytics with your Laravel website can help you make data-driven decisions to improve user experience and optimize your online presence.
In this article, we will walk through the process of integrating Google Analytics with a Laravel website, step by step, with clear examples for each stage.
Prerequisites
Before we begin, make sure you have the following:
- A working Laravel application.
- A Google Analytics account. If you don’t have one, sign up for free at https://analytics.google.com.
Step 1: Set up Google Analytics Account to integrate with laravel
If you already have a Google Analytics account, skip this step. Otherwise, sign in to your Google account and navigate to https://analytics.google.com. Click on the “Start Measuring” button and follow the instructions to set up your Google Analytics property.
Once you have set up the property, you will be provided with a Tracking ID. This ID is essential for integrating Google Analytics into your Laravel website.
Step 2: Install Required Packages
In your Laravel project, you will need to install the “spatie/laravel-analytics” package to simplify the integration process. This package provides a Laravel wrapper for the Google Analytics Reporting API. Open your terminal and run the following command:
composer require spatie/laravel-analytics
Step 3: Configure Package
After installing the package, open your Laravel application’s .env file and add the following lines:
ANALYTICS_VIEW_ID=YOUR_GOOGLE_ANALYTICS_VIEW_ID
GOOGLE_ANALYTICS_CREDENTIALS=PATH_TO_YOUR_CREDENTIALS_JSON_FILE
Replace YOUR_GOOGLE_ANALYTICS_VIEW_ID with the View ID of the property you want to track (can be found in your Google Analytics account). Make sure you have set the appropriate permissions for the email associated with the credentials JSON file.
Step 4: Obtain Google Analytics Credentials
To access the Google Analytics API, you need to create credentials in the Google Cloud Console. Follow these steps:
- Go to the Google Cloud Console at https://console.cloud.google.com.
- Create a new project or select an existing one.
- In the sidebar, navigate to “APIs & Services” > “Credentials.”
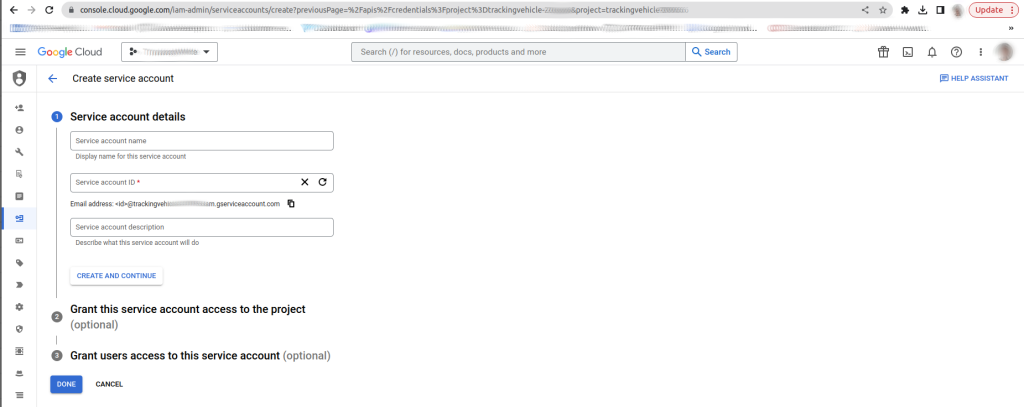
- Click on “Create Credentials” and choose “Service Account.”
- Fill in the necessary details and grant the “Project” > “Editor” role to the service account.
- Click “Continue” and then “Done.”
- Locate the created service account under the “Service Accounts” tab and click on the ellipsis (three dots) button.
- Select “Create Key” and choose “JSON” as the key type. The JSON file containing your credentials will be downloaded.
Save the downloaded JSON file in a secure location within your Laravel project and update the GOOGLE_ANALYTICS_CREDENTIALS value in the .env file with the correct path.

Step 5: Implement Google Analytics Service
Now, let’s create a service that will interact with the Google Analytics Reporting API. In your Laravel application, create a new file named GoogleAnalytics.php in the app/Services directory.
// app/Services/GoogleAnalytics.php

namespace App\Services;

use Spatie\Analytics\Analytics;
use Spatie\Analytics\Period;

class GoogleAnalytics
{
    protected $analytics;

    public function __construct(Analytics $analytics)
    {
        $this->analytics = $analytics;
    }

    public function getWebsiteVisitors($days = 7)
    {
        return $this->analytics->fetchTotalVisitorsAndPageViews(Period::days($days));
    }

    // Add more methods as needed for different analytics data
}
Step 6: Utilize the Google Analytics Service to integrate with laravel
Now that we have our service set up, we can use it in our controllers or views to fetch Google Analytics data. Let’s create a simple example to display the total number of website visitors in the last 7 days.First, add a route in your web.php file:
// routes/web.php

use App\Services\GoogleAnalytics;

Route::get('/', function (GoogleAnalytics $ga) {
    $visitorsData = $ga->getWebsiteVisitors(7);
    $totalVisitors = $visitorsData->sum('visitors');

    return view('welcome', compact('totalVisitors'));
});
Next, create a corresponding Blade view file (welcome.blade.php in this example):
<!-- resources/views/welcome.blade.php -->

<!DOCTYPE html>
<html>
<head>
    <title>Google Analytics Integration</title>
</head>
<body>
    <h1>Total Visitors in the Last 7 Days: {{ $totalVisitors }}</h1>
</body>
</html>
Step 7: Test the Integration
Finally, visit your Laravel website and navigate to the route you created. The view should display the total number of website visitors in the last 7 days, fetched from Google Analytics.
Conclusion
Integrating Google Analytics with your Laravel website opens up a world of possibilities for analyzing user behavior and making data-driven decisions. In this article, we covered the step-by-step process of integrating Google Analytics with a Laravel website, from obtaining credentials to creating a custom service to fetch analytics data. Remember to explore the Google Analytics Reporting API documentation for more advanced data retrieval and analysis.
By leveraging the power of Google Analytics, you can gain valuable insights into your website’s performance and user engagement, leading to better user experiences and improved business outcomes. Happy tracking!


